There are a few factors to consider here. If your shoe has a full-length removable insole, then the Pedistep Active orthotic is the best option. Shoes with a removable insole tend to be casual, sporting and recreational shoes that are loose fitting.
The Pedistep Active orthotic replaces the factory fitted insole, which you removed and replaced with the Pedistep Active Orthotic. If the Pedistep Active orthotic is a little longer than the shoe itself, you can use the factory insole as a template to trim down the Pedistep orthotic so that it fits snuggly in the shoe.
Click here to see how to fit the full length orthotic to a full-length shoe
If your shoes don’t have a removable factory fitted insole then the Pedistep Regular orthotic is the best option. These shoes are generally fashion or dress shoes they have a narrower last and are usually a tighter fit. The Pedistep Regular orthotic is a 2/3 Length orthotic that is designed to sit on top of the non-removable insole.
If you intend to swap your Pedistep orthotics between shoes with a removable insole and shoes without a removable insole, the Pedistep Regular Orthotic is the perfect choice. It can sit on top of the factory insole even if it’s a removable.
If you want to wear the Pedistep orthotics in fashion footwear such as with an high heel, boots or ballet flats, then use the High Heel Fashion orthotic. Don’t try to fit either a 2/3 or a full length Pedistep orthotic into these types of shoes, they won’t fit.
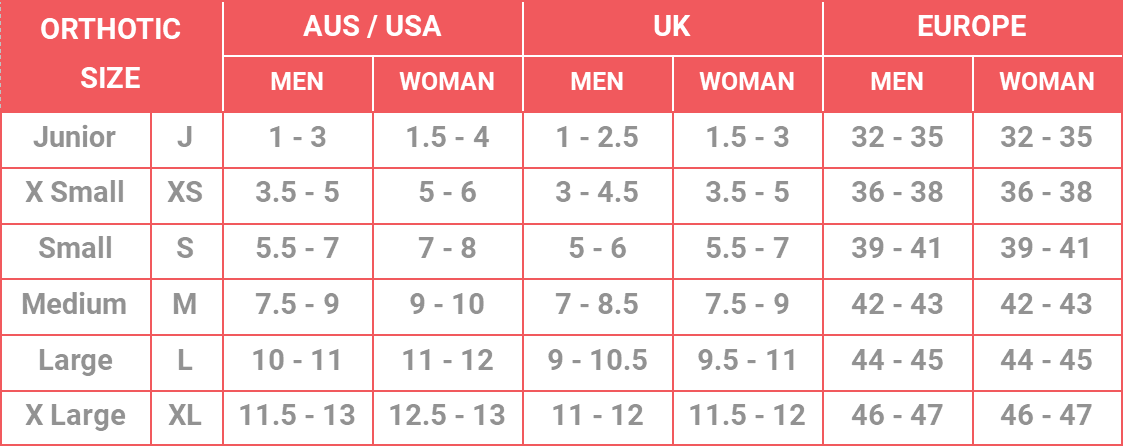
Pedistep orthotic sizing is based on shoe size. The table below will assist you in identifying the appropriate size orthotic for your foot:
Will need to change colour / font also slides and orthotic table are orientated differently, do we modify one of them so they look the same
However, there is no single international standard for shoe sizing. This means that there can be some difference in shoe size between footwear brands, and even sometimes within the same brand.
If you want to be certain that you are ordering the correct size Pedistep orthotic for your foot, we suggest you do one of the following:
- Do we modify the acrylic chart artwork and adapt, have as a print PDF?
- Do we use simple ruler of wall to bisection point, and adjust measurement to orthotic size to account for 5 to 10mm proximal to bisection.
- Other options
The Pedistep Regular and Pedistep Fashion orthotics do not require trimming. They simply sit on top of the factory insole of whatever shoe you are putting it in.
Sometimes, it may be necessary to trim the front edge of the Pedistep Active (full length) orthotic so that it fits snuggly into your shoe. The trimming process is quite simple if you follow the steps below.
Step 1: Remove the factory fitted insole from the shoes.
Step 2: Insert the Pedistep Active orthotic into the shoe to check it will fit without trimming.
Note: If the orthotic is too long, you will not be able get the orthotic to fit into the shoe, and the heel part of the orthotic will stick out of the shoe, or when you press the orthotic into the shoe, the heel portion of the orthotic will crease. In either case, you will need to trim the orthotic.
Step 3: Take the left foot factory fitted insole and right foot Pedistep Active orthotic, position them so that the bottom surface of both are pressed together.
Step 4: With the bottom surfaces still pressed together, hold the insole and Pedistep Active orthotic vertically and gently tap them down a level surface until the heel of the insole and the heel of the Pedistep Active orthotic are level.
Step 5: While keeping the insole and Pedistep Active orthotic together lay them down on a firm level surface with the Pedistep Active orthotic on the bottom and the insole on top. The Pedistep orthotic should be longer than the insole.
Step 6: Gently lay down both the factory insole and the Pedistep Active orthotic, with the Pedistep Active orthotic on the bottom. Using a pen or marker to trace around the front of the insole so that the shape of the front of the insole is transferred to the bottom of the Pedistep Active orthotic.
Step 7: Using the scissors, trim the excess material from the Pedistep Active orthotic.
Step 8: Insert the trimmed Pedistep Active orthotic into the shoe to check that it fits correctly.
Repeat for the opposite foot.
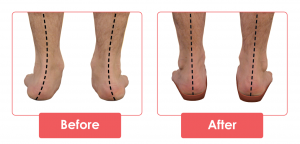
Excessive Pronation
Pronation is the term medical professionals use to describe the flattening of the foot that occurs when you stand or walk.
How do I select the correct size Pedistep orthotic Slides ?
The table below will assist you in getting the best fit Pedistep slides for your foot.
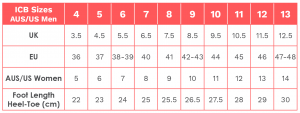
If you are a half size, we suggest you buy the next size up or purchase the adjustable slide.
Do we have a sizing guide similar to our orthotic sizing guide ?
How do I select the correct size Pedistep orthotic for my foot?
Pedistep orthotic sizing is based on shoe size. The table below will assist you in identifying the appropriate size orthotic for your foot?
Will need to change colour / font also slides and orthotic table are orientated differently, do we modify one of them so they look the same
However, there is no single international standard for shoe sizing. This means that there can be some difference in shoe size between footwear brands, and even sometimes within the same brand.
If you want to be certain that you are ordering the correct size Pedistep orthotic for your foot, we suggest you do one of the following:
- Do we modify the acrylic chart artwork and adapt, have as a print PDF?
- Do we use simple ruler of wall to bisection point, and adjust measurement to orthotic size to account for 5 to 10mm proximal to bisection.
- Other options?
There are a few factors to consider here. If your shoe has a full-length removable insole, then the Pedistep Active orthotic is the best option. Shoes with a removable insole tend to be casual, sporting and recreational shoes that are loose fitting.
The Pedistep Active orthotic replaces the factory fitted insole, which you removed and replaced with the Pedistep Active Orthotic. If the Pedistep Active orthotic is a little longer than the shoe itself, you can use the factory insole as a template to trim down the Pedistep orthotic so that it fits snuggly in the shoe.
Click here to see how to fit the full length orthotic to a full-length shoe
If your shoes don’t have a removable factory fitted insole then the Pedistep Regular orthotic is the best option. These shoes are generally fashion or dress shoes they have a narrower last and are usually a tighter fit. The Pedistep Regular orthotic is a 2/3 Length orthotic that is designed to sit on top of the non-removable insole.
If you intend to swap your Pedistep orthotics between shoes with a removable insole and shoes without a removable insole, the Pedistep Regular Orthotic is the perfect choice. It can sit on top of the factory insole even if it’s a removable.
If you want to wear the Pedistep orthotics in fashion footwear such as with an high heel, boots or ballet flats, then use the High Heel Fashion orthotic. Don’t try to fit either a 2/3 or a full length Pedistep orthotic into these types of shoes, they won’t fit.
The Pedistep Regular and Fashion orthotics do not require trimming. They simply sit on top of the factory insole of whatever shoe you are putting it in.
Sometimes, it may be necessary to trim the front edge of the Pedistep Active (full length) orthotic so that it fits snuggly into your shoe. The trimming process is quite simple if you follow the steps below.
To trim the Pedistep Active orthotic you will need a biro pen, or felt tip marker and a pair of scissors.
If you don’t feel confident in trimming the Pedistep Active orthotic to fit in your shoe, a shoe repair store, or cobbler should be able to fit them to your shoes for you.
Step 1: Remove the factory fitted insole from the shoes.
Step 2: Insert the Pedistep Active orthotic into the shoe to check it will fit without trimming.
Note: If the orthotic is too long, you will not be able get the orthotic to fit into the shoe the heel part of the orthotic will stick out of the shoe, or when you press the orthotic into the shoe, the heel portion of the orthotic will crease. In either case, you will need to trim the orthotic.
Step 3 Take the left foot factory fitted insole and right foot Pedistep Active orthotic, position them so that the bottom surface of both are pressed together.
Step 4: With the bottom surfaces still pressed together, hold the insole and Pedistep Active orthotic vertically and gently tap them down a level surface until the heel of the insole and the heel of the Pedistep Active orthotic are level.
Step 5: While keeping the insole and Pedistep Active orthotic together lay them down on a firm level surface with the Pedistep Active orthotic on the bottom and the insole on top. The Pedistep orthotic should be longer than the insole.
Step 6: Gently lay down both the factory insole and the Pedistep Active orthotic, with the Pedistep Active orthotic on the bottom. Using the Biro pen or marker, trace around the front of the insole so that the shape of the front of the insole is transferred to the bottom of the Pedistep Active orthotic.
Step 7: Using the scissors, trim the excess material from the Pedistep Active orthotic.
Step 8: Insert the trimmed Pedistep Active orthotic into the shoe to check that it fits correctly.
Step 9: Take the trimmed Pedistep Active orthotic and the untrimmed Pedistep Active orthotic and align the bottom surfaces of both.
Step 10: Trace around the front of the trimmed Pedistep Active orthotic so that the shape of the front of the insole is transferred to untrimmed the Pedistep Active orthotic.
Step 11: Trim the other Pedistep Active orthotic and check that it fits into the shoe.
Will need photos of each step, a movie would also be great, and then the instructions can be summarised and more succinct.