There are a few factors to consider here. If your shoe has a full-length removable insole, then the Pedistep Active orthotic is the best option. Shoes with a removable insole tend to be casual, sporting and recreational shoes that are loose fitting.
The Pedistep Active orthotic replaces the factory fitted insole, which you removed and replaced with the Pedistep Active Orthotic. If the Pedistep Active orthotic is a little longer than the shoe itself, you can use the factory insole as a template to trim down the Pedistep orthotic so that it fits snuggly in the shoe.
Click here to see how to fit the full length orthotic to a full-length shoe
If your shoes don’t have a removable factory fitted insole then the Pedistep Regular orthotic is the best option. These shoes are generally fashion or dress shoes they have a narrower last and are usually a tighter fit. The Pedistep Regular orthotic is a 2/3 Length orthotic that is designed to sit on top of the non-removable insole.
If you intend to swap your Pedistep orthotics between shoes with a removable insole and shoes without a removable insole, the Pedistep Regular Orthotic is the perfect choice. It can sit on top of the factory insole even if it’s a removable.
If you want to wear the Pedistep orthotics in fashion footwear such as with an high heel, boots or ballet flats, then use the High Heel Fashion orthotic. Don’t try to fit either a 2/3 or a full length Pedistep orthotic into these types of shoes, they won’t fit.
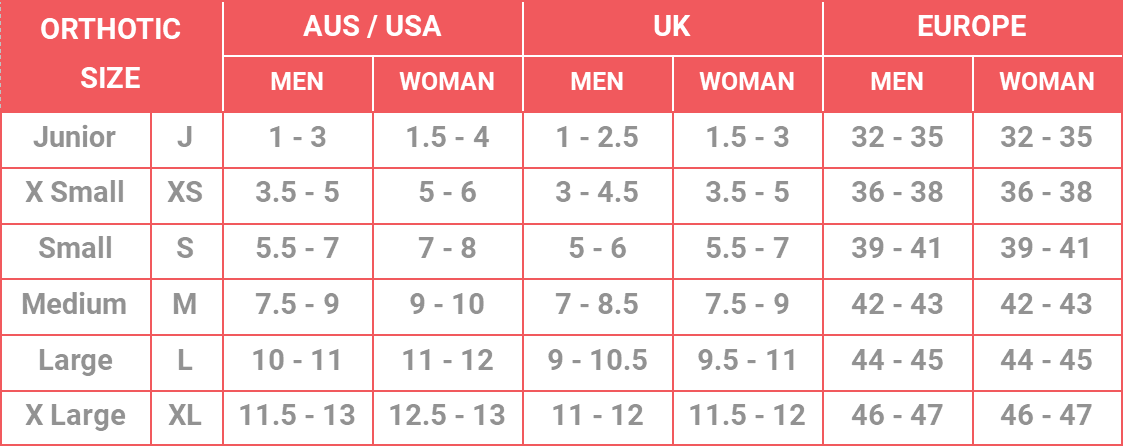
Pedistep orthotic sizing is based on shoe size. The table below will assist you in identifying the appropriate size orthotic for your foot:
Pedistep Regular and Fashion Orthotics do not require trimming. They simply sit on top of the factory insole of whatever shoe you are putting it in.
Sometimes, it may be necessary to trim the front edge of the Pedistep Active (full length) orthotic so that it fits snuggly into your shoe. The trimming process is quite simple - just follow the steps below.
Step 1: Remove the factory fitted insole from the shoes.
Step 2: Insert the Pedistep Active orthotic into the shoe to check whether it will fit without trimming.
Note: If the orthotic is too long, you will not be able get the orthotic to fit into the shoe the heel part of the orthotic will stick out of the shoe, or when you press the orthotic into the shoe, the heel portion of the orthotic will crease. In either case, you will need to trim the orthotic.
Step 3: Take the left foot factory fitted insole and right foot Pedistep Active orthotic - position them so that the bottom surface of both are pressed together.
Step 4: With the bottom surfaces still pressed together, hold the insole and Pedistep Active orthotic vertically and gently tap them down a level surface until the heel of the insole and the heel of the Pedistep Active orthotic are level.
Step 5: While keeping the insole and Pedistep Active orthotic together lay them down on a firm level surface with the Pedistep Active orthotic on the bottom and the insole on top. The Pedistep orthotic should be longer than the insole.
Step 6: Gently lay down both the factory insole and the Pedistep Active orthotic, with the Pedistep Active orthotic on the bottom. Using a pen or marker to, trace around the front of the insole so that the shape of the front of the insole is transferred to the bottom of the Pedistep Active orthotic.
Step 7: Use scissors to trim the excess material from the Pedistep Active orthotic.
Step 8: Insert the trimmed Pedistep Active orthotic into the shoe to check that it fits correctly.
Repeat this process for the other foot.
The table below will assist you in getting the best fit Pedistep slides for your foot.
If you are a half size, we suggest you buy the next size up or purchase the adjustable velcro strap style.
There are a few factors that will influence how long the Pedistep orthotic last, these are:
- Bodyweight
- Level of activity
- Type of activity
If you are heavy and do a lot of physical activity, or you stand for long periods of time, the orthotics will not last as long as they would with someone who is lighter and does little or no physical activity.
Pedistep orthotics work by supporting your feet and limiting excessive pronation. Over time, the Pedistep orthotic will compress – just like your shoes - and loose their corrective effects.
You will notice when this happens because your feet will feel less supported, or you will start getting a re-occurence of pain and discomfort in your feet.
When this occurs remove the Pedistep orthotics and replace them.
Your Pedistep orthotics can be cleaned with cool soapy water, wiped clean and left to dry in a shaded place before putting them back into your shoes.
The Pedistep orthotics should not be left near a heat source such as a fire or heater, or in direct sunlight during the summer months, as they may warp or distort.
Pedistep Orthotics are made of a material called Ethylene Vinyl Acetate, (EVA). This is the same material used to make the midsole of joggers, and other everyday items like yoga mats. They are perfectly safe to wear.
The Pedistep fashion orthotics come with Velcro tabs that are applied to the orthotic and your shoes to prevent the orthotic from slipping. You may not need to use them, but if you do, follow these simple steps:
Step 1: Identify the which half of the Velcro tab is the hook (the firm rough surface) or the loop (the softer fury surface).
Step 2: Take the hook part of the Velcro dot, remove the adhesive backing and apply the Velcro tab to the bottom surface of the orthotic, and the back under the heel.
Step 3: Apply the loop part of the Velcro to the to the hook part of the Velcro and remove the backing.
Step 4: Gently insert the orthotic into the shoe and align the heel of the Pedistep fashion orthotic with the heel of the shoe, press down firmly and hold in place for 10 to 15 seconds.
You should then be able to remove the orthotic from the shoe leaving behind the Velcro loop tab.
It’s important to have the softer loop attached to the shoe rather than the hook, it will avoid ruining a pair of stockings if you left your Pedistep fashion orthotics in another pair of shoes.
The only difference between the Pedistep orthotics range and the ICB Medial range of prescription orthotics is the density of the product – which is how hard they are.
The ICB Medical range of orthotics are prescribed by a medical professional such as a podiatrist, physiotherapy, chiropractor, osteopath or doctor, who will first assess you and provide you with an appropriate orthotic for your unique needs. These orthotics are available in a variety of densities, some of which are quite firm, and can be moulded to your feet so that they contour to the exact shape of your foot, which makes them more comfortable to wear.
The Pedistep orthotic is softer than the prescription ICB orthotics, this means you can buy them and wear them without needing to see a medical professional - this saves you time and more importantly money.
In many cases it can be cheaper to replace your Pedistep orthotics yearly, rather than getting a prescription orthotic every 2 to 3 years.